| WAT HATSADAWAT (วัดหัสดาวาส) |
| Wat Hatsadawat is located north of the city island near Wat Na Phra Meru. An unnamed road passes in front of it, so it is easy to find. It is categorized as a reconstructed ruin. Wat Hatsadawat is aligned with an east/west orientation. It is comprised of three primary structures. There is a reconstructed sermon hall, which consists of only an outline of its basic foundation layer. One chedi rests at the front of the sermon hall. This bell-shaped chedi is constructed in the Sri Lanka style. It is basically round with multiple rings leading to its spire. The harmika is present and the spire has at least 30 rings. This chedi sits on a square foundation that is decorated with brick balustrades. Excavations around this chedi revealed stucco pieces of elephant statues (similar to the ones at Wat Maheyong). These elephant images suggest that Wat Hatsadawat may have been constructed during the Early Ayutthaya period. A second bell-shaped chedi rests at the back of the sermon hall. This has an octagonal base, and its upper portions are missing from the top of its relic chamber. In addition, the monastery walls have been rebuilt at the ground level, and there are traces of smaller chedi in situ. There is still part of a moat surrounding Wat Hatsadawat. Records show that this temple served as site of an armistice treaty between Burma and Siam. King Chakkraphat (1548-1569) signed this truce in 1549 to gain a short reprieve from a war that began when he refused to present a white elephant to the Burmese King (Bayinnaung) as a gift. King Chakkraphat realized that the Burmese army was too enormous to withstand without causing massive destruction and perdition to monks, Brahmin priests, inhabitants, and citizens of the city. Therefore, he decided to accept an invitation to meet with the Burmese King to negotiate a truce. He ordered that officials erect a royal building and two royal thrones equal in height and space. These were constructed at Wat Phra Meru and Wat Hatsadawat (Cushman 48-49). King Chakkraphat then offered to give the Burmese king four white elephants instead of the two that he had originally requested. The Burmese King asked that he also be allowed to take Siamese Prince Ramesuan and some other men back to the Burmese capital as collateral (a customary practice at that time). Although he resisted, King Chakkraphat was forced to relent. In return, the Burmese king consented that Ayutthaya could retain all the inhabitants of provincial cities that the Burmese had captured. They were then released. Prince Ramesuan, Phraya Cakri, and Phra Sunthon Songkhram collected their children and wives and departed for Burma in accordance with the royal decree (Cushman 48-49). There is evidence that Wat Hatsadawat had become an active temple for a short period during recent times. An employee of the Fine Arts Department, known as Uncle Mian, recalls his time as a novice monk at this monastery. He was attracted to Wat Hatsadawat because a monk at this temple was well-known for his skills with magic. This mischievous monk wasn't strict and often broke from clerical conventions. The monk was fond of drinking alcohol and sometimes ordered his students to kill hens for his meals. A chief monk in the city questioned him about his consumption of alcohol. The monk challenged his interrogator to bring him the teapots as evidence. When the lids were removed it was discovered that the interrogator's teapot was the one containing alcohol (Sukphisit 45-46). Such magic tricks probably didn't help Wat Hatsadawat to survive long as an active temple. It fell into ruin once again, and the Fine Arts Department was placed in charge of it as a historic site. |

| | | | | | | | |

| | | | | | | |
| Text & photographs by Ken May - September 2009 |
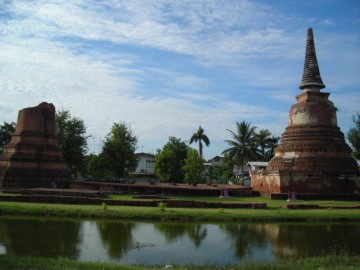
| (View of Wat Hatsadawat) |
| (View of Wat Hatsadawat) |
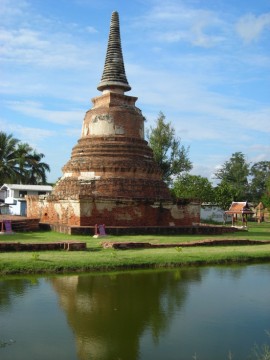
| (Chedi of Wat Hatsadawat) |
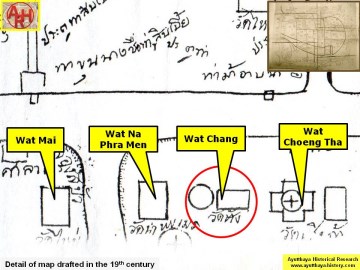

| (Detail of a 19th century map - Courtesy Sam Chao Phraya Museum) |
| (Detail of Phraya Boran Rachathanin's map - Anno 1926) |
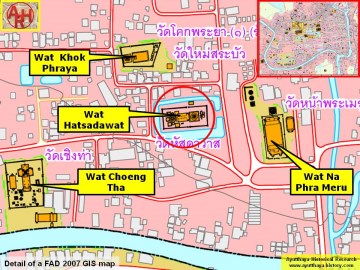
| (Detail of a 2007 Fine Arts Department GIS map - Courtesy of the Fine Arts Department - 3th Region) |
| Addendum When King Maha Cakkraphat was informed of the contents of the royal letter, he made his decision, “This time their army is [BCEF: exceptionally] enormous and it appears to be beyond the capacity of our soldiers to save the Capital. If we do not go out, the monks, Brahmans, inhabitants, citizens and populace will all be faced with perdition and destruction, and even the Holy Religion will be disgraced. We shall have to go out. Even if the King of Hongsawadi does not constantly abide by his promises, as in the royal letter which has arrived, we will see to it that our promises are firmly upheld.” Having so decided, he had a royal letter prepared to specify where he would proceed to and had an embassy carry it out to present to the King of Hongsawadi. Then he ordered officials to go out to erect a royal building with two royal thrones, equal in height and spaced [BCDF: four] [E: one] sòk apart, in the area between Phra Meru Rachikaram Monastery and Hatsadawat Monastery. Then he had a jeweled throne prepared higher than the royal thrones, and had the Holy and Glorious Triple Gems escorted out to preside over the meeting. [1] Wat Hatsadawat was also known as Wat Chang or the Monastery of the Elephant. The site is situated in geographical coordinates: 14° 21' 46.44" N, 100° 33' 27.08" E. References: [1] Cushman, Richard D. - The Royal Chronicles of Ayutthaya (2006) - page 48 / Source: Phan Canthanumat, British Museum, Reverend Phonnarat, Phra Cakkraphatdiphong & Royal Autograph. - The King of Hongsawadi’s Letter and Ayutthaya’s Response. [2] Rajanubhab, Damrong (Prince) - Our Wars with the Burmese (1917) - White Lotus, Bangkok (2000) - page 40. |
| Addendum & maps by Tricky Vandenberg April 2016 |


| Source: Phra Rachawang Lae Wat Boran Nai Changwat Phra Nakhon Ayutthaya (2511 BE) |